Audio only mode using the room loudspeakers

On the wall-mounted touch-screen, select ‘Start Audio Only’


The system will start up: 


You can then pair to the room through Bluetooth to your device 

Volume is controlled both through the wall-mounted touch-screen AND through your device. 

When leaving the room, tap Bluetooth Clear to remove your phone form the devices saved settings. 

↑ Top of the page

Presentation mode (without hybrid meeting)

Turn on the Full system:

Or Select ‘Presentation mode’ from the touchscreen panel if the panel is already in Audio Mode:

ii. The main screen should turn on automatically:

Connect to the room either using the ClickShare dongle (available on the lectern in the room or from the Porters Lodge)

or wirelessly using the ClickShare software (while on eduroam or Conference networks)

On the prompt screen, select the Bradfield Room:

When asked, enter the one-time passcode from the large screen into your device:

You will then be able to share your device screen, or select an individual window to share:

Tip 1: If you wish to ‘hide’ your device from the presentation screen in the room, clicking on the small icon in the top right-hand corner ensures only the screensaver is displayed until you are ready to start sharing content :

Tip 2: Airplay option for Mac and iOS users:

The screen in the room and the room speakers can be connected directly to wirelessly through the Apple AirPlay functions without needing to use the dongle or the ClickShare software. The screen can be used for mirroring or as a secondary screen similar to a plug-in monitor:

Note that this mode seems to have slightly higher latency than the Barco native client so you may still prefer to use that.

↑ Top of the page

Hybrid Meeting Mode

You need to connect the dongle to your device:

Note: If the large screen in the room is not required for presentation or to display online meeting attendees you are all set to go at this step and can skip to the next step about using Video and Sound.

For screen sharing to the room: A USB drive will appear on your device with the ClickShare software which you can launch directly from the drive. Once the the software is running you will see a O (circle) icon in the task bar on a PC or menu bar on a Mac. Once you click on this pop-up will appear on your device that allows you to select the appropriate window to share to the screen in the room:

Using Video and Sound: In your chosen meeting software (Zoom, MS Teams, Google Meet etc) go to the Device Settings where the room microphone and cameras should show up as Room SpeakerPhone and Room Camera as options that can be selected where you would normally see you webcam and headset. Examples from Teams:

If you wish to use the screen in the room to display remote attendees and presentations, connect to the display as per the instructions above.

Once you have done that and joined the meeting, select the meeting window from the ClickShare.

Your meeting will then display on the large screen and attendees will be able to share to their screens to present to online attendees and in room attendees as you would in a normal online meeting.

Important note: If you are planning to present from the same laptop that is running the meeting in a hybrid setting it’s important that you share using the meeting software’s sharing functionality for everyone in the room AND remotely to see the presentation. ie. do not use the clickshare selector to change anything at this stage, just keep sharing your meeting software and then use the Zoom or Teams sharing functionality from there.

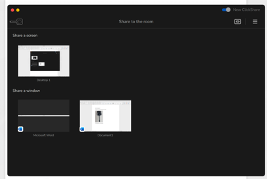
Tip 1: If someone in the room wants to present from a different laptop than the one you are using to run the meeting they can do that but should mute both their microphone and the sounds from their own device to avoid causing feedback.

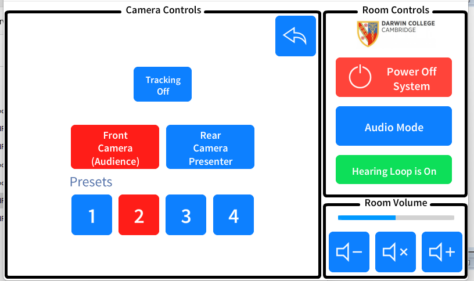
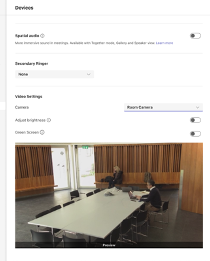
Tip 2: The room has two cameras, one located to the right of the large screen, facing into the room and one located to the rear of the room, facing the screen but only one camera will be available at any time, for which there are 2 operating modes:

  1. Auto-tracking on: The smart microphone located in the ceiling of the room will track where in the room attendees are speaking and will switch between the two cameras as appropriate.  To help with this there are three available settings adapted to how the room is used:

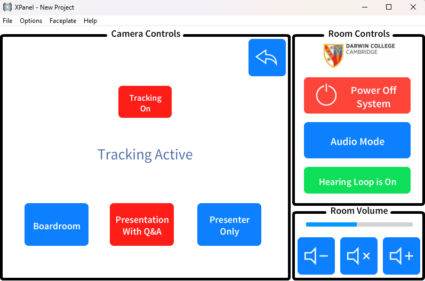
Boardroom is for the standard “Meeting” setup when there is a conference table set up in front of the screen.

Presentation is for when room is set up Theatre Style and you want to capture the screen in the room as well as the presenter using the lectern.

Presenter only is for when you just want to zoom in on the speaker anywhere at the front of the room and don’t need to include the in-room display. This will track the speaker if they move away from the lectern too.

2. Auto-tracking off: If you wish to ‘lock’ the camera during a meeting to only show the Presenter view or Audience view, this can be done on the panel by turning off tracking, selecting a single camera and choosing one of the available preset locations.

↑ Top of the page